The Stage
Build the screen layout for SID Symphony - three tracks, score display, and a key that makes the SID chip sing.
Need to set up your tools first? See Getting Started.
What You’re Building
Before a single note scrolls across the screen, before you score a single point, before the crowd goes wild — you need a stage.
By the end of this unit, you’ll have:
- A screen that looks like a game (even though it isn’t one yet)
- Three tracks waiting for notes (even though only one works)
- A key that makes the SID chip sing (just one note, but your note)
It’s not much. It’s also everything. Every Guitar Hero, every Rock Band, every rhythm game ever made started here: a place for things to happen, and a sound when you poke it.
Let’s build the stage.
The Screen Layout
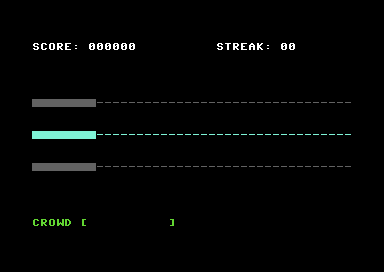
Here’s what we’re aiming for:
┌────────────────────────────────────────┐
│ SCORE: 000000          STREAK: 00      │  ← Top panel
├────────────────────────────────────────┤
│                                        │
│ ████░░░░░░░░░░░░░░░░░░░░░░░░░░░░░░░░░░ │  ← Track 1 (Z) - dimmed
│                                        │
│ ████░░░░░░░░░░░░░░░░░░░░░░░░░░░░░░░░░░ │  ← Track 2 (X) - ACTIVE
│                                        │
│ ████░░░░░░░░░░░░░░░░░░░░░░░░░░░░░░░░░░ │  ← Track 3 (C) - dimmed
│                                        │
├────────────────────────────────────────┤
│ CROWD [          ]                     │  ← Bottom panel
└────────────────────────────────────────┘
The hit zone is on the left — that solid block where notes arrive and you smack the key. The rest of the track is where notes will scroll from. Right now it’s empty. Ominously empty.
The top panel shows score and streak. Both zero. For now.
The bottom panel has the crowd meter. They’re cautiously optimistic. Waiting.
Setting Up
Create a new file called symphony.asm. This is your game. Every unit builds on this file.
To build and run as you work:
acme -f cbm -o symphony.prg symphony.asm && x64sc symphony.prgOr do them separately:
acme -f cbm -o symphony.prg symphony.asm   # Compile
x64sc symphony.prg                          # Run
When you see “Build it. Run it.” in the lesson, use these commands.
First, the boilerplate. Every C64 program needs this preamble to make the system happy:
;──────────────────────────────────────────────────────────────
; SID SYMPHONY
; A rhythm game for the Commodore 64
; Unit 1: The Stage
;──────────────────────────────────────────────────────────────

            * = $0801

; BASIC stub: 10 SYS 2064
            !byte $0c, $08, $0a, $00, $9e
            !byte $32, $30, $36, $34
            !byte $00, $00, $00

;───────────────────────────────────────
; Entry point
;───────────────────────────────────────
            * = $0810

main:
            jsr setup_screen
            jsr init_sid
            jmp main_loop
Don’t panic. The BASIC stub is just a magic incantation that makes RUN work. You’ll type it once and never think about it again. The interesting bit is what comes next.
Constants
Before we write any logic, let’s define where things live. Add these after the BASIC stub:
;───────────────────────────────────────
; Constants
;───────────────────────────────────────
SCREEN      = $0400             ; Screen RAM
COLOUR      = $d800             ; Colour RAM

; Screen layout (row positions)
ROW_SCORE   = 1                 ; Top panel
ROW_TRACK1  = 8                 ; Track 1 (Z)
ROW_TRACK2  = 12                ; Track 2 (X) - active
ROW_TRACK3  = 16                ; Track 3 (C)
ROW_CROWD   = 23                ; Bottom panel

; Colours
COL_WHITE   = $01
COL_GREY    = $0b
COL_CYAN    = $03
COL_GREEN   = $05

; Hit zone width
HIT_ZONE_X  = 8                 ; Column where hit zone ends

; SID registers
SID         = $d400
SID_FREQ_LO = SID + 0           ; Frequency low byte
SID_FREQ_HI = SID + 1           ; Frequency high byte
SID_PW_LO   = SID + 2           ; Pulse width low byte
SID_PW_HI   = SID + 3           ; Pulse width high byte
SID_CTRL    = SID + 4           ; Control (waveform + gate)
SID_AD      = SID + 5           ; Attack/Decay
SID_SR      = SID + 6           ; Sustain/Release
SID_VOLUME  = SID + 24          ; Master volume

; CIA for keyboard reading
CIA1_PRA    = $dc00             ; Keyboard column select
CIA1_PRB    = $dc01             ; Keyboard row read
Forty columns, twenty-five rows. That’s your canvas. Every screen position is just SCREEN + (row * 40) + column.
Clearing the Decks
The C64 boots up with a cheerful blue screen and a blinking cursor. We don’t want that. We want darkness. Control. A blank canvas.
;───────────────────────────────────────
; Setup screen
;───────────────────────────────────────
setup_screen:
            lda #$00
            sta $d020           ; Border colour - black
            sta $d021           ; Background colour - black

            ; Clear screen and colour RAM
            ldx #$00
clear_loop:
            lda #$20            ; Space character
            sta $0400,x         ; Screen RAM page 1
            sta $0500,x         ; Screen RAM page 2
            sta $0600,x         ; Screen RAM page 3
            sta $06e8,x         ; Screen RAM remaining
            lda #$00            ; Black
            sta $d800,x         ; Colour RAM page 1
            sta $d900,x         ; Colour RAM page 2
            sta $da00,x         ; Colour RAM page 3
            sta $dae8,x         ; Colour RAM remaining
            inx
            bne clear_loop

            jsr draw_top_panel
            jsr draw_tracks
            jsr draw_bottom_panel
            rts
Build it. Run it. You should see… nothing. A black void.
Perfect.
Drawing the Panels
Now we need structure. The top panel shows score and streak:
;───────────────────────────────────────
; Draw top panel
;───────────────────────────────────────
draw_top_panel:
            ldx #$00
top_loop:
            lda score_text,x
            beq top_done        ; Zero byte = end of string
            sta SCREEN + (ROW_SCORE * 40),x
            lda #COL_WHITE
            sta COLOUR + (ROW_SCORE * 40),x
            inx
            bne top_loop
top_done:
            rts
And the data it draws:
;───────────────────────────────────────
; Data
;───────────────────────────────────────
score_text:
            !scr "score: 000000          streak: 00"
            !byte 0
The !scr directive converts text to C64 screen codes. The zero byte at the end marks where the string stops.
The Tracks
Three tracks. One active, two waiting. The active track glows cyan. The others are grey — visible but clearly “not yet.”
;───────────────────────────────────────
; Draw tracks
;───────────────────────────────────────
draw_tracks:
            ; Track 1 (dimmed)
            ldx #$00
t1_loop:
            cpx #HIT_ZONE_X
            bcs t1_dim          ; Past hit zone? Draw dash
            lda #$a0            ; Solid block in hit zone
            sta SCREEN + (ROW_TRACK1 * 40),x
            lda #COL_GREY
            sta COLOUR + (ROW_TRACK1 * 40),x
            jmp t1_next
t1_dim:
            lda #$2d            ; Dash in lane
            sta SCREEN + (ROW_TRACK1 * 40),x
            lda #COL_GREY
            sta COLOUR + (ROW_TRACK1 * 40),x
t1_next:
            inx
            cpx #40
            bne t1_loop

            ; Track 2 (active - cyan)
            ldx #$00
t2_loop:
            cpx #HIT_ZONE_X
            bcs t2_dim
            lda #$a0
            sta SCREEN + (ROW_TRACK2 * 40),x
            lda #COL_CYAN
            sta COLOUR + (ROW_TRACK2 * 40),x
            jmp t2_next
t2_dim:
            lda #$2d
            sta SCREEN + (ROW_TRACK2 * 40),x
            lda #COL_CYAN
            sta COLOUR + (ROW_TRACK2 * 40),x
t2_next:
            inx
            cpx #40
            bne t2_loop

            ; Track 3 (dimmed)
            ldx #$00
t3_loop:
            cpx #HIT_ZONE_X
            bcs t3_dim
            lda #$a0
            sta SCREEN + (ROW_TRACK3 * 40),x
            lda #COL_GREY
            sta COLOUR + (ROW_TRACK3 * 40),x
            jmp t3_next
t3_dim:
            lda #$2d
            sta SCREEN + (ROW_TRACK3 * 40),x
            lda #COL_GREY
            sta COLOUR + (ROW_TRACK3 * 40),x
t3_next:
            inx
            cpx #40
            bne t3_loop

            rts
Yes, there’s repetition. Yes, we could refactor it. We will, later, when we’ve earned the right to care about elegance. Right now we care about seeing something on screen.
The Bottom Panel
Crowd meter. Watching. Waiting.
;───────────────────────────────────────
; Draw bottom panel
;───────────────────────────────────────
draw_bottom_panel:
            ldx #$00
bottom_loop:
            lda crowd_text,x
            beq bottom_done
            sta SCREEN + (ROW_CROWD * 40),x
            lda #COL_GREEN
            sta COLOUR + (ROW_CROWD * 40),x
            inx
            bne bottom_loop
bottom_done:
            rts

crowd_text:
            !scr "crowd [          ]              "
            !byte 0
Build and run. Three horizontal tracks. The middle one glows cyan. The others wait in grey. It’s starting to look like a game.
Making Noise
The stage is set. Time to give it a voice.
The SID chip lives at $D400. It has three voices, each with its own registers. We’re only using voice 1 today:
| Address | Purpose |
|---|---|
| $D400-$D401 | Frequency (16-bit) |
| $D402-$D403 | Pulse width (12-bit) |
| $D404 | Control (waveform + gate) |
| $D405 | Attack/Decay |
| $D406 | Sustain/Release |
| $D418 | Master volume |
Let’s initialise the SID:
;───────────────────────────────────────
; Init SID
;───────────────────────────────────────
init_sid:
            lda #$0f            ; Maximum volume
            sta SID_VOLUME

            lda #$00            ; Attack=0, Decay=0 (instant on)
            sta SID_AD
            lda #$f4            ; Sustain=15 (full), Release=4 (short fade)
            sta SID_SR

            lda #$00            ; Pulse width low byte
            sta SID_PW_LO
            lda #$08            ; Pulse width high byte (50% duty cycle)
            sta SID_PW_HI

            lda #$12            ; Frequency low byte
            sta SID_FREQ_LO
            lda #$22            ; Frequency high byte
            sta SID_FREQ_HI
            rts
The ADSR envelope shapes how the sound evolves:
- Attack = 0: Sound reaches full volume instantly
- Decay = 0: No decay phase
- Sustain = 15: Holds at full volume while key is held
- Release = 4: Short fade when key is released
The pulse width must be set for pulse wave to produce sound. $0800 gives a 50% duty cycle — a nice square-ish tone.
Playing Notes
To make a sound, we open the “gate” — set bit 0 of the control register. Bit 6 selects pulse wave:
;───────────────────────────────────────
; Play/stop note
;───────────────────────────────────────
play_note:
            lda #$41            ; Pulse wave ($40) + gate on ($01)
            sta SID_CTRL
            rts

stop_note:
            lda #$40            ; Pulse wave + gate off
            sta SID_CTRL
            rts
Gate on = sound starts, enters attack/decay/sustain. Gate off = sound enters release phase and fades.
Reading the Keyboard
We want the note to sustain while X is held, and fade when released. The KERNAL’s GETIN routine only tells us “a key was pressed” — it doesn’t detect key release. For that, we need to read the keyboard matrix directly via the CIA chip.
The C64 keyboard is an 8×8 matrix. To check if X is pressed:
- Write to CIA1_PRA to select the column
- Read CIA1_PRB to check the row
- A 0 bit means the key is down
;───────────────────────────────────────
; Check if X key is currently held
; Returns A=1 if pressed, A=0 if not
;───────────────────────────────────────
check_x_key:
            lda #%11111011      ; Select column 2 (X is row 7, col 2)
            sta CIA1_PRA
            lda CIA1_PRB        ; Read rows
            and #%10000000      ; Check row 7 (bit 7)
            bne x_not_pressed   ; Bit set = not pressed
            lda #$01
            rts
x_not_pressed:
            lda #$00
            rts
The Main Loop
Now we tie it together. The main loop tracks three states:
- Idle (0): No sound, waiting for keypress
- Playing (1): Gate open, note sustaining
- Releasing (2): Gate closed, note fading out
;───────────────────────────────────────
; Main loop
; key_state: 0=idle, 1=playing, 2=releasing
;───────────────────────────────────────
main_loop:
            jsr check_x_key     ; A=1 if X pressed
            cmp #$01
            beq x_pressed

            ; X not pressed
            lda key_state
            cmp #$01            ; Were we playing?
            bne main_loop       ; No - idle or releasing, keep looping
            ; Transition: playing → releasing
            lda #$02
            sta key_state
            jsr stop_note       ; Close gate, starts release fade
            jmp main_loop

x_pressed:
            ; X pressed
            lda key_state
            cmp #$01
            beq main_loop       ; Already playing, keep looping
            ; Transition: idle/releasing → playing
            lda #$01
            sta key_state
            jsr play_note       ; Open gate
            jmp main_loop

;───────────────────────────────────────
; Variables
;───────────────────────────────────────
key_state:
            !byte $00
The key insight: we only call play_note when starting to play, and only call stop_note when starting to release. This lets the SID’s envelope do its work without being constantly retriggered.
Build it. Run it. Hold X — the note sustains. Release X — it fades smoothly.
You just played the SID.
What You’ve Built
Take a breath. Look at what you made:
- A black screen with a proper game layout
- Three tracks — one active, two waiting
- A score display (doesn’t count yet, but it’s there)
- A crowd meter (doesn’t move yet, but it’s watching)
- A key that makes the SID sing, with proper sustain and release
This is the stage. Everything that follows — scrolling notes, hit detection, scoring, the crowd going wild — happens here, in this structure you built.
Save your work. You’ll need it.
What You’ve Learnt
- Screen RAM - $0400-$07E7 holds 1000 character codes (40×25)
- Colour RAM - $D800-$DBE7 holds the colour for each character
- SID fundamentals - Frequency, pulse width, waveform, gate, ADSR envelope
- ADSR envelope - Attack/Decay/Sustain/Release shapes how notes sound
- CIA keyboard matrix - Direct hardware access for key-up/key-down detection
- State machines - Track what’s happening to avoid retriggering
Next Unit
The stage is set. The SID is ready. But nothing’s moving yet.
In Unit 2, we spawn notes on the right and watch them scroll toward that hit zone on the left. The highway comes alive.