Hello Amiga
Your first Amiga program. Copper display. Hardware sprite. Custom chipset in action.
What You’re Building
Your first Amiga program. A complete Frogger-style playfield with a hardware sprite frog.
By the end of this unit:
- A coloured playfield appears on screen
- A frog sprite sits in the start zone
- You can change colours and positions
- You’ve experienced the Amiga’s custom chipset
The Amiga’s Secret Weapon
The Amiga wasn’t just another computer. It had custom silicon—three chips working together to create graphics and sound that seemed impossible in 1985.
Agnus handles memory and timing. It orchestrates everything, making sure graphics data flows at exactly the right moment.
Denise draws the display. Sprites, playfields, colours—all handled by dedicated hardware, not the CPU.
Paula manages sound and some I/O. Four channels of 8-bit audio, hardware-mixed.
This custom chipset is why Amiga games looked and sounded better than anything else at the time. And you’re about to use it.
Run It First
Before we look at any code, get this running.
Step 1: Build the Executable
vasmm68k_mot -Fhunkexe -kick1hunks -o signal signal.asmThis creates signal—an AmigaDOS executable.
Step 2: Create a Bootable Disk
The Amiga boots from floppy disks. We need to create an ADF (Amiga Disk File) image using xdftool (from the amitools package—install with pip install amitools):
# Create and format a blank disk
xdftool signal.adf create
xdftool signal.adf format "Signal"

# Make it bootable with a startup script
xdftool signal.adf makedir s
xdftool signal.adf boot install
echo "signal" > startup-sequence
xdftool signal.adf write startup-sequence s/startup-sequence
rm startup-sequence

# Copy our program to the disk
xdftool signal.adf write signal
Step 3: Run in an Emulator
Use FS-UAE or WinUAE with:
- Kickstart 1.3 ROM (required—the Amiga’s operating system)
- A500 configuration (standard Amiga 500)
- signal.adf in drive DF0:
The emulator will boot from the disk and run your program automatically.
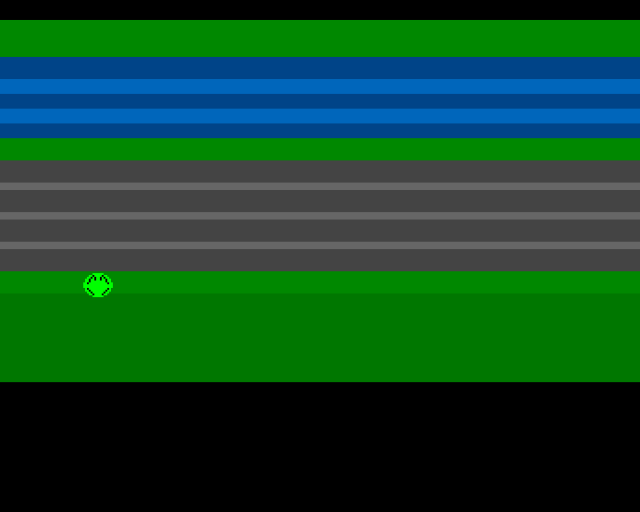
You should see coloured horizontal bands representing the game zones, and a bright green frog in the start area.
To exit: Click the left mouse button. On real hardware, you’ll need to reset—this program takes over the machine completely.
The Playfield
Look at what’s on screen:
- Green at top — the home zone (where frogs want to reach)
- Blue bands — the river with wave highlights
- Green strip — the safe median
- Grey bands — the road with lane markings
- Green at bottom — the start zone (where you begin)
- Black — borders
This is all done with the Copper—a programmable display co-processor that can change colours at specific screen positions. No bitmap required for these solid colour bands.
The Frog
That bright green blob in the start zone? That’s a hardware sprite. The Amiga has eight of them, and we’re using one for the frog.
Hardware sprites are brilliant:
- The custom chipset draws them automatically
- They overlay the playfield without affecting it
- Moving them is just changing a few numbers
- No need to erase and redraw
Experiment: Change the Values
Open signal.asm and find the TWEAKABLE VALUES section at the top:
FROG_X          equ 160         ; Frog horizontal position (try 64-280)
FROG_Y          equ 180         ; Frog vertical position (try 44-220)

COLOUR_HOME     equ $0080       ; Home zone: green
COLOUR_WATER    equ $0048       ; Water: dark blue
COLOUR_FROG     equ $0f0        ; Frog body: bright green
Try these experiments:
Move the frog:
- Change
FROG_Xto64(left edge) or280(right edge) - Change
FROG_Yto100(puts the frog on the road)
Change colours:
COLOUR_WATER equ $0f00— red water (lava level?)COLOUR_FROG equ $00ff— blue frogCOLOUR_HOME equ $0ff0— yellow home zone
Colours are in $0RGB format—one hex digit each for red, green, blue. Values 0-F (0-15).
Rebuild after each change. See immediate results.
What’s Happening (Preview)
Don’t worry about understanding all the code yet—Unit 3 will break it down. But here’s what the program does:
- Takes over the machine — disables the operating system
- Sets up the Copper list — tells the hardware what colours to use at each screen position
- Positions the sprite — writes the frog’s location to the Copper list
- Enables DMA — turns on the custom chipset’s automatic display
- Loops forever — the hardware does all the work
The CPU barely does anything once it’s set up. That’s the beauty of the Amiga’s custom chipset—dedicated hardware handles the graphics.
The Code
Here’s the complete scaffold. Skim it now, study it later:
;──────────────────────────────────────────────────────────────
; SIGNAL - A Frogger-style game for the Commodore Amiga
; Unit 1: Hello Amiga
;
; This is your scaffold. Run it, see the frog, change the values.
;──────────────────────────────────────────────────────────────

;══════════════════════════════════════════════════════════════
; TWEAKABLE VALUES - Change these and see what happens!
;══════════════════════════════════════════════════════════════

FROG_X          equ 160         ; Frog horizontal position (try 64-280)
FROG_Y          equ 140         ; Frog vertical position (try 44-220)

; Colours are $0RGB (0-15 for each component)
COLOUR_HOME     equ $0080       ; Home zone: green
COLOUR_WATER    equ $0048       ; Water: dark blue
COLOUR_WAVE     equ $006b       ; Water highlight: lighter blue
COLOUR_MEDIAN   equ $0080       ; Safe median: green
COLOUR_ROAD     equ $0444       ; Road: dark grey
COLOUR_MARKER   equ $0666       ; Road marking: light grey
COLOUR_START    equ $0080       ; Start zone: green
COLOUR_BORDER   equ $0070       ; Border: darker green

; Frog colours (sprite palette: colours 17-19)
COLOUR_FROG     equ $0f0        ; Frog body: bright green (contrasts with dark green zones)
COLOUR_EYES     equ $ff0        ; Frog eyes: yellow
COLOUR_OUTLINE  equ $000        ; Frog outline: black

;══════════════════════════════════════════════════════════════
; HARDWARE REGISTERS
;══════════════════════════════════════════════════════════════

CUSTOM      equ $dff000

; Custom chip register offsets
DMACONR     equ $002
DMACON      equ $096
INTENA      equ $09a
INTREQ      equ $09c
COP1LC      equ $080
COPJMP1     equ $088
VPOSR       equ $004
COLOR00     equ $180
SPR0PTH     equ $120
SPR0PTL     equ $122

;══════════════════════════════════════════════════════════════
; CODE SECTION (in chip RAM for sprites/copper to work)
;══════════════════════════════════════════════════════════════
            section code,code_c

start:
            lea     CUSTOM,a5           ; Custom chip base in A5

            ; --- Take over the machine ---
            move.w  #$7fff,INTENA(a5)   ; Disable all interrupts
            move.w  #$7fff,INTREQ(a5)   ; Clear pending interrupts
            move.w  #$7fff,DMACON(a5)   ; Disable all DMA

            ; --- Set sprite pointer in copper list ---
            lea     frog_data,a0        ; A0 = sprite data address
            move.l  a0,d0               ; D0 = sprite data address
            swap    d0                  ; High word first
            lea     sprpth_val,a1
            move.w  d0,(a1)             ; Write high word
            swap    d0                  ; Low word
            lea     sprptl_val,a1
            move.w  d0,(a1)             ; Write low word

            ; --- Install copper list ---
            lea     copperlist,a0
            move.l  a0,COP1LC(a5)       ; Point copper at our list
            move.w  d0,COPJMP1(a5)      ; Strobe to start copper

            ; --- Enable DMA ---
            move.w  #$83a0,DMACON(a5)   ; Master + copper + sprites (+ bitplanes)

            ; === Main Loop ===
mainloop:
            ; Wait for vertical blank
            move.l  #$1ff00,d1
.vbwait:
            move.l  VPOSR(a5),d0
            and.l   d1,d0
            bne.s   .vbwait

            ; Check left mouse button (run until reset)
            btst    #6,$bfe001
            bne.s   mainloop

            ; Button pressed - loop forever (machine takeover, reset to exit)
            bra.s   mainloop

;══════════════════════════════════════════════════════════════
; CHIP RAM DATA (copper list and sprites - same section as code)
;══════════════════════════════════════════════════════════════

copperlist:
            dc.w    COLOR00,$0000       ; Black border at top

            ; --- Sprite 0 palette (colours 17-19) ---
            dc.w    $01a2,COLOUR_FROG   ; Colour 17: body
            dc.w    $01a4,COLOUR_EYES   ; Colour 18: eyes
            dc.w    $01a6,COLOUR_OUTLINE ; Colour 19: outline

            ; --- Sprite 0 pointer (filled by CPU) ---
            dc.w    SPR0PTH             ; SPR0PTH register
sprpth_val: dc.w    $0000               ; High word (patched by code)
            dc.w    SPR0PTL             ; SPR0PTL register
sprptl_val: dc.w    $0000               ; Low word (patched by code)

            ; === HOME ZONE ===
            dc.w    $2c07,$fffe
            dc.w    COLOR00,COLOUR_HOME

            ; === WATER ZONE (5 lanes) ===
            dc.w    $4007,$fffe
            dc.w    COLOR00,COLOUR_WATER    ; Lane 1

            dc.w    $4c07,$fffe
            dc.w    COLOR00,COLOUR_WAVE     ; Wave highlight

            dc.w    $5407,$fffe
            dc.w    COLOR00,COLOUR_WATER    ; Lane 2

            dc.w    $5c07,$fffe
            dc.w    COLOR00,COLOUR_WAVE     ; Wave highlight

            dc.w    $6407,$fffe
            dc.w    COLOR00,COLOUR_WATER    ; Lane 3

            ; === MEDIAN (safe zone) ===
            dc.w    $6c07,$fffe
            dc.w    COLOR00,COLOUR_MEDIAN

            ; === ROAD ZONE (4 lanes) ===
            dc.w    $7807,$fffe
            dc.w    COLOR00,COLOUR_ROAD     ; Lane 1

            dc.w    $8407,$fffe
            dc.w    COLOR00,COLOUR_MARKER   ; Road marking

            dc.w    $8807,$fffe
            dc.w    COLOR00,COLOUR_ROAD     ; Lane 2

            dc.w    $9407,$fffe
            dc.w    COLOR00,COLOUR_MARKER   ; Road marking

            dc.w    $9807,$fffe
            dc.w    COLOR00,COLOUR_ROAD     ; Lane 3

            dc.w    $a407,$fffe
            dc.w    COLOR00,COLOUR_MARKER   ; Road marking

            dc.w    $a807,$fffe
            dc.w    COLOR00,COLOUR_ROAD     ; Lane 4

            ; === START ZONE ===
            dc.w    $b407,$fffe
            dc.w    COLOR00,COLOUR_START

            dc.w    $c007,$fffe
            dc.w    COLOR00,COLOUR_BORDER   ; Bottom border

            ; === BOTTOM ===
            dc.w    $f007,$fffe
            dc.w    COLOR00,$0000           ; Black

            ; End of copper list
            dc.w    $ffff,$fffe

;──────────────────────────────────────────────────────────────
; SPRITE DATA
;──────────────────────────────────────────────────────────────
            even
frog_data:
            ; Control words: Y=180 ($B4), X=160/2=80 ($50)
            dc.w    $b450               ; VSTART<<8 | HSTART
            dc.w    $c400               ; VSTOP<<8 | control bits

            ; 16 lines of sprite data (plane0, plane1)
            ; Colours: 00=transparent, 01=green, 10=yellow, 11=black
            dc.w    $0000,$0000         ; ................
            dc.w    $07e0,$0000         ; .....XXXXXX.....
            dc.w    $1ff8,$0420         ; ...XXXXXXXXXX...
            dc.w    $3ffc,$0a50         ; ..XXXXXXXXXXXX..
            dc.w    $7ffe,$1248         ; .XXXXXXXXXXXXXX.
            dc.w    $7ffe,$1008         ; .XXXXXXXXXXXXXX.
            dc.w    $ffff,$2004         ; XXXXXXXXXXXXXXXX
            dc.w    $ffff,$0000         ; XXXXXXXXXXXXXXXX
            dc.w    $ffff,$0000         ; XXXXXXXXXXXXXXXX
            dc.w    $7ffe,$2004         ; .XXXXXXXXXXXXXX.
            dc.w    $7ffe,$1008         ; .XXXXXXXXXXXXXX.
            dc.w    $3ffc,$0810         ; ..XXXXXXXXXXXX..
            dc.w    $1ff8,$0420         ; ...XXXXXXXXXX...
            dc.w    $07e0,$0000         ; .....XXXXXX.....
            dc.w    $0000,$0000         ; ................
            dc.w    $0000,$0000         ; ................

            ; End marker (required for hardware)
            dc.w    $0000,$0000
Build It
vasmm68k_mot -Fhunkexe -kick1hunks -o signal signal.asmThe -kick1hunks flag ensures compatibility with Kickstart 1.x (the A500’s operating system).
Key Takeaways
- The Amiga has custom chips (Agnus, Denise, Paula) that handle graphics and sound
- The Copper can change display settings mid-screen
- Hardware sprites are drawn automatically by the chipset
- Colours use $0RGB format (4 bits per component)
- Once set up, the CPU does almost nothing—the hardware runs the show
What’s Next
In Unit 2, we’ll read the joystick and move the frog around the screen. The custom chipset handles the display—now let’s add interactivity.